|
Optical ray diagrams
need to be drawn very carefully and with precision as they need to 'look
right' and you may have to measure the angles on your diagram.
You
should use a SHARP pencil and a ruler to construct these diagrams. You
may need a protractor and a rubber.
Label
diagrams in ink.
 A
boundary is drawn between media of different optical density (air/glass,
air/water etc.) A
boundary is drawn between media of different optical density (air/glass,
air/water etc.)
In
a diagram a boundary is represented by a solid
line, drawn with a ruler and sharp pencil.
A
boundary is shaded at the back with chevrons if it is reflective (i.e.
if light rays will reflect off it)


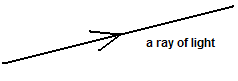
A
ray is also represented by a solid line. It always has an arrow on it to show which way it is going.
A
normal is the line you draw perpendicular
to the boundary (at right angles to it). It is drawn so that you can
measure angles from it. This is sometimes drawn as a solid line with
a 'right angle symbol' put between it and the boundary OR as a dashed
line - again the symbol showing it is perpendicular to the bounday must
be included.

Angles
are always measured from the normal to the ray.

Click here to go to the page on how to construct rays through lenses
LOJ
October 2002
|


 Drawing
Ray Diagrams
Drawing
Ray Diagrams